
How to install MongoDB on your Synology NAS

Introduction
MongoDB is a popular and widely used NoSQL database that offers powerful features and flexible data modelling. If you are a Synology NAS user, you might be interested in installing MongoDB on your device to use it as a backend for your web or mobile applications.
This tutorial will guide you through installing the latest MongoDB version on your Synology NAS, provided your CPU supports the AVX instruction set. Before proceeding with the installation, it is recommended to check your CPU's compatibility with the AVX instruction set.
However, even if your CPU does not support AVX, you can still follow this tutorial to install a prior version of MongoDB that does not require it. Note that the latest version that does not require AVX is 4.4, but it will soon be deprecated, so upgrading to a newer version is highly recommended.
Let's get started and install MongoDB on your Synology NAS!
Disclaimer: It's important to note that any action taken based on this tutorial is at your own risk. I am not responsible for any damage, loss of data or any other issues that may arise as a result of following this guide.
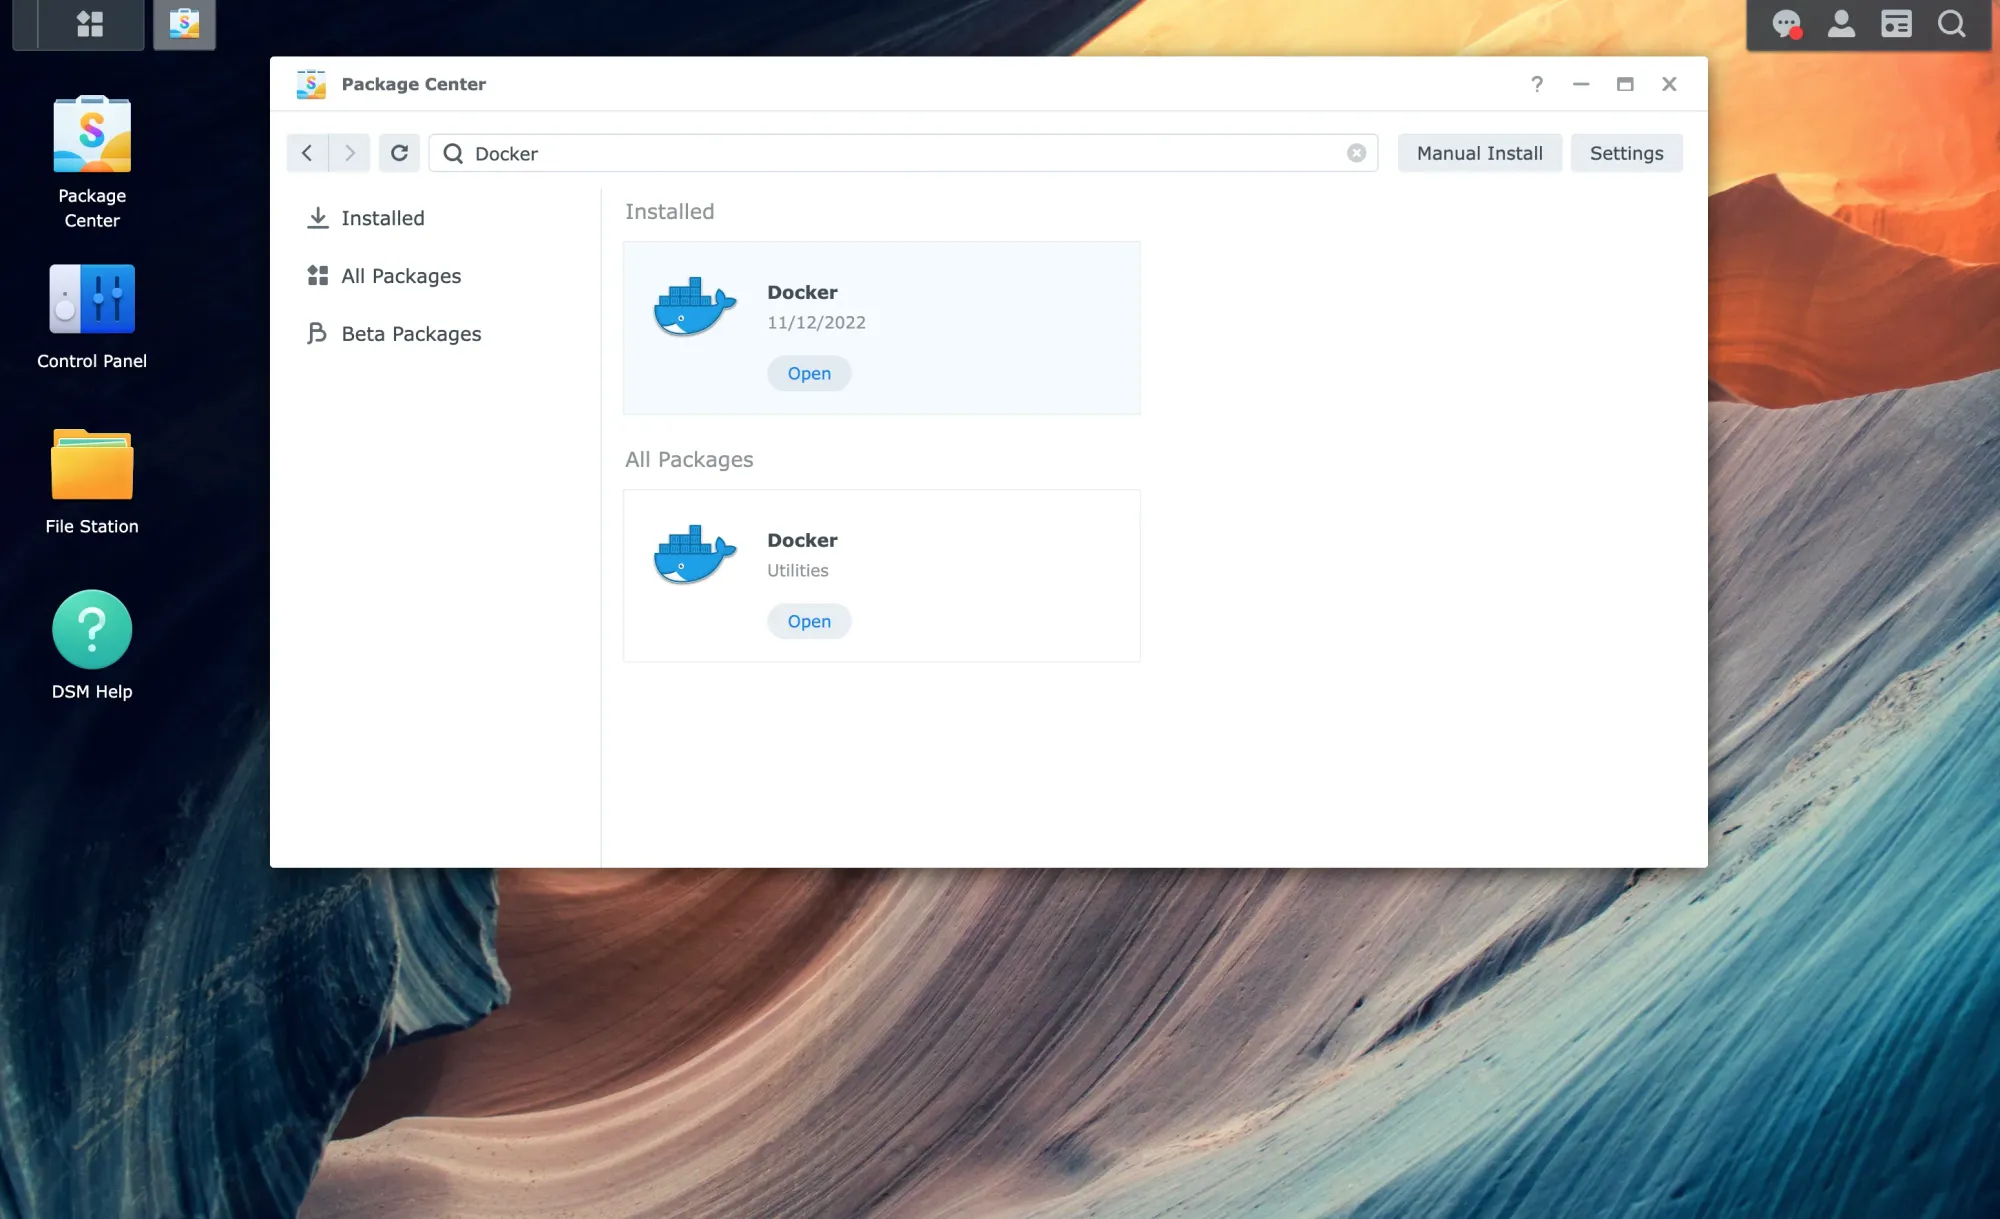
Step 1: Install Docker on Synology NAS
Perhaps you are familiar with installing and using Docker on your Synology NAS before. If so, you may be able to bypass this step.
Docker is a popular and powerful tool that makes it easier to run software on your device that is not available in the Synology Package Center. You can read more about the benefits of Docker and how it works by clicking here.
If you haven't yet installed Docker, don't worry - it's quick and easy to get up and running. Simply head to the Synology Package Center and search for the "Docker" package. Once you locate it, just click "Install" to begin the process.
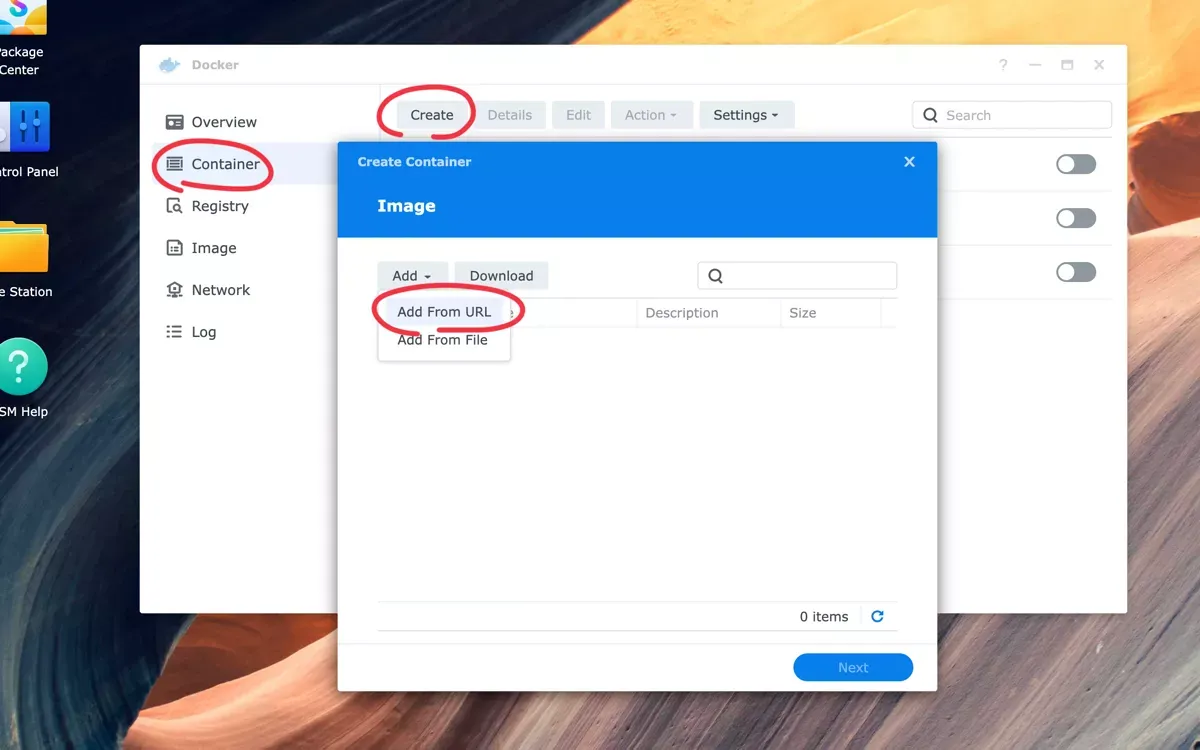
Step2: Create a Docker container for MongoDB
Download the MongoDB container image from the online repository
To create a container, navigate to the "Container" section located on the left side of the Docker application's interface. Once there, simply click the "Create" button to open the "Create Container" window.
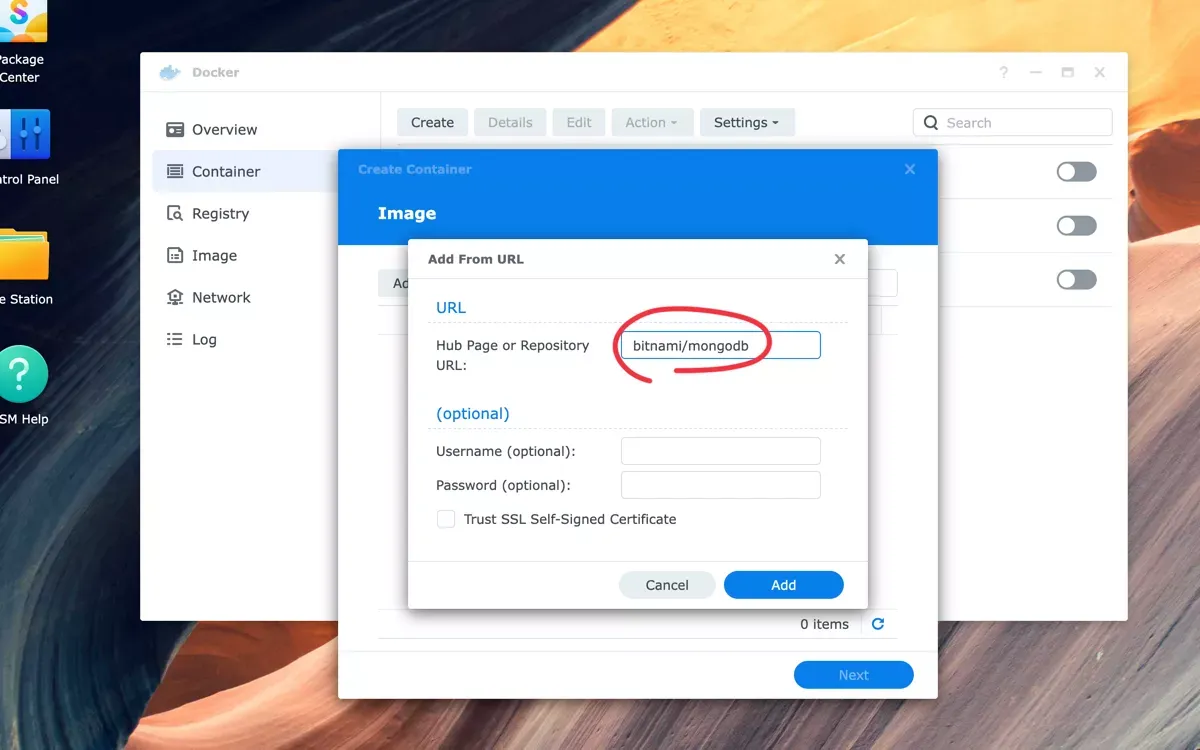
Next, you will need to specify where to find the desired image for your MongoDB container. To do so, click the "Add" dropdown button and then select "Add From URL".
Just type "bitnami/mongodb" (without quotes) in the URL field and click "Add".
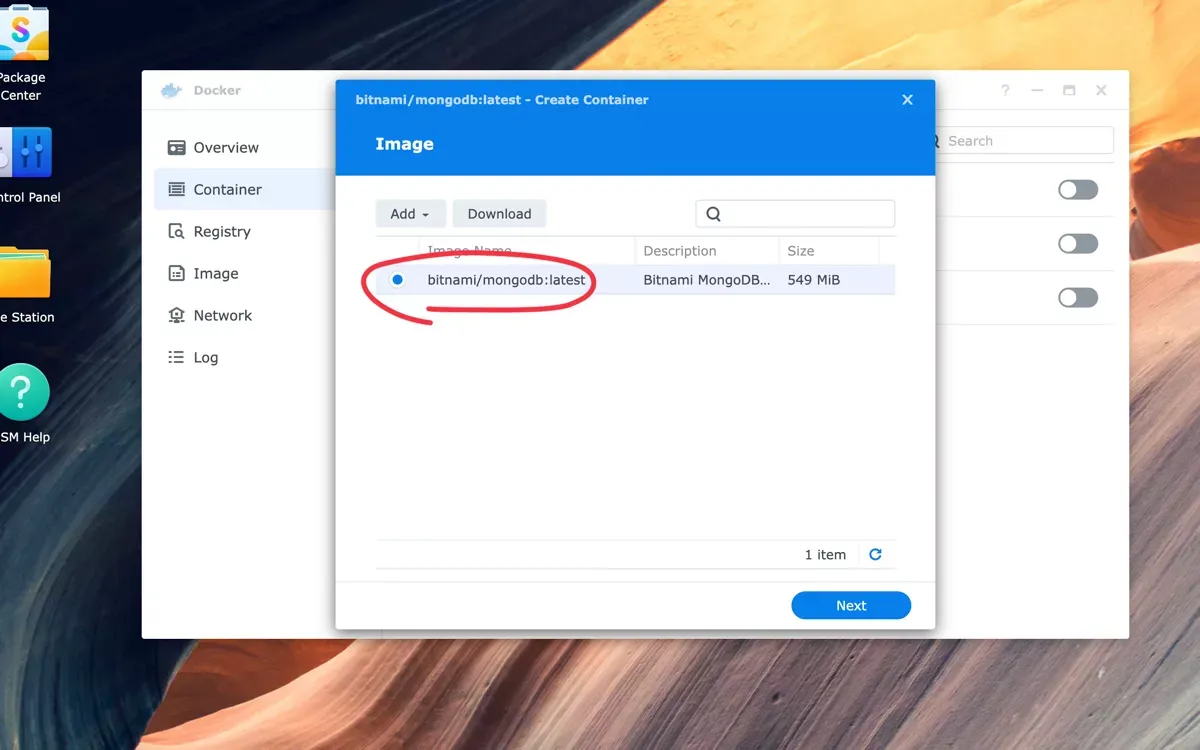
When prompted to choose a tag for your MongoDB installation, it's recommended to stick with the default option, which will download the latest available version. Simply click on the "Select" button to begin the download process. Currently, the most recent version of MongoDB is 6.
However, if you prefer to install a previous version of MongoDB that doesn't require the AVX instruction set, you can opt for the latest tag associated with version 4.4. As mentioned in the introduction of this tutorial, version 4.4 is the most recent release that doesn't require AVX, but it will soon be deprecated, so upgrading to a newer version is recommended.
Once the image has downloaded successfully, you will be able to select it and proceed by clicking the "Next" button to create your container.
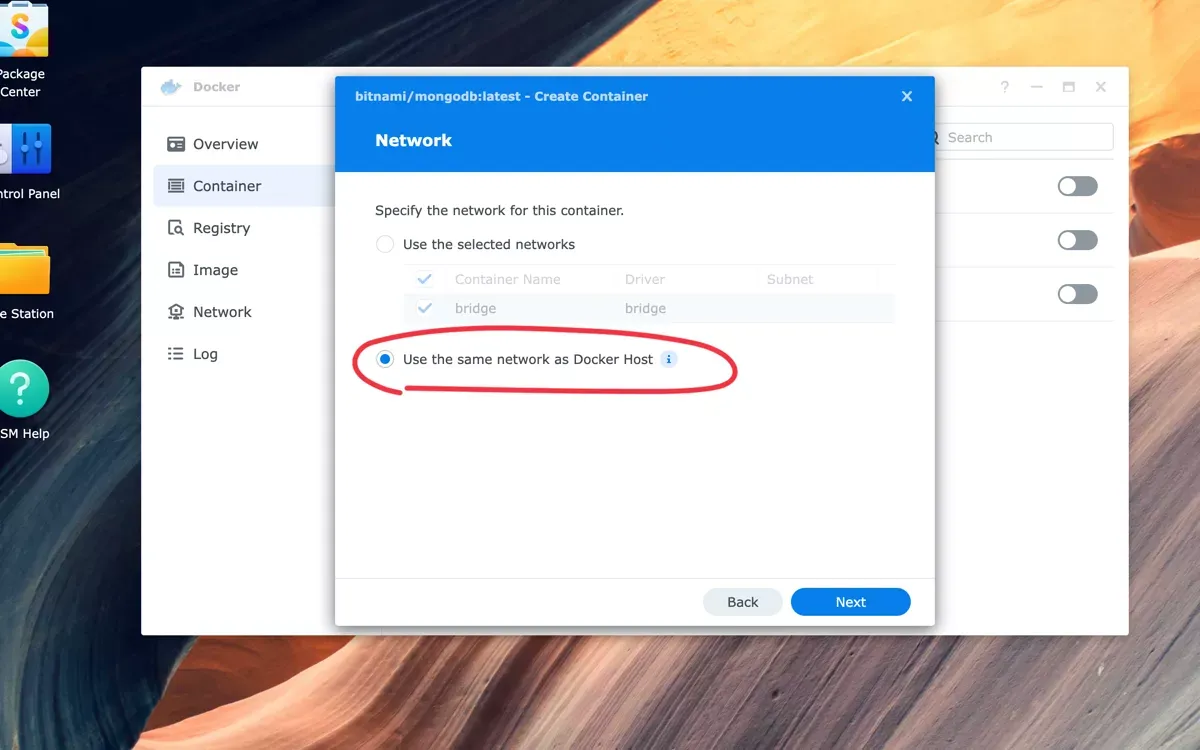
Choose the network settings for the Mongo DB container
During the process of container creation, you will be prompted to specify the network that the container will utilize. To ensure that the container is properly connected to your Synology NAS, select the option to "Use the same network as Docker Host". Afterward, click the "Next" button to proceed.
By utilizing this option, your container will be assigned the same network address as your Synology NAS. This means that you can easily connect to MongoDB from the same IP address that you assigned to your NAS.
Choose the general settings for the Mongo DB container
As you navigate to the General Settings screen, you will encounter a variety of options that enable you to control the amount of resources that the container is permitted to consume. Although you will be able to customize certain aspects of the container, I recommend leaving most of the settings at their default values.

Specify some initialisation settings for Mongo DB
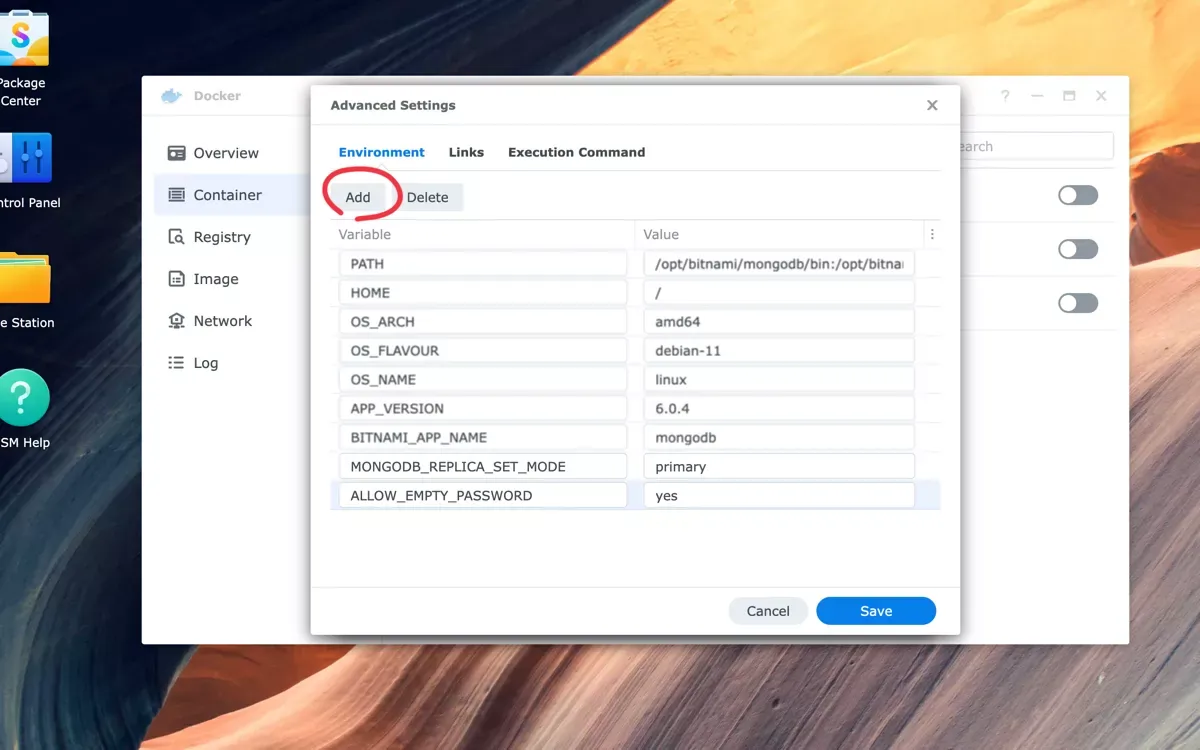
Prior to moving on to the subsequent screen, it's recommended that you take a moment to access the "Advanced Settings" section. Here, you will have the opportunity to incorporate specific environment variables that will only be used during the initialisation process, which occurs when the container is first launched.
Next, you will need to include the subsequent environment variables:
- ALLOW_EMPTY_PASSWORD: yes
If desired, you may also choose to establish a database and a user account complete with a corresponding password. To accomplish this, you will need to incorporate additional environment variables into the configuration process:
- MONGODB_USERNAME: my_user
- MONGODB_PASSWORD: password123
- MONGODB_DATABASE: my_database
After you have completed the aforementioned steps, you can finalize the process by selecting the "Save" button, followed by "Next".
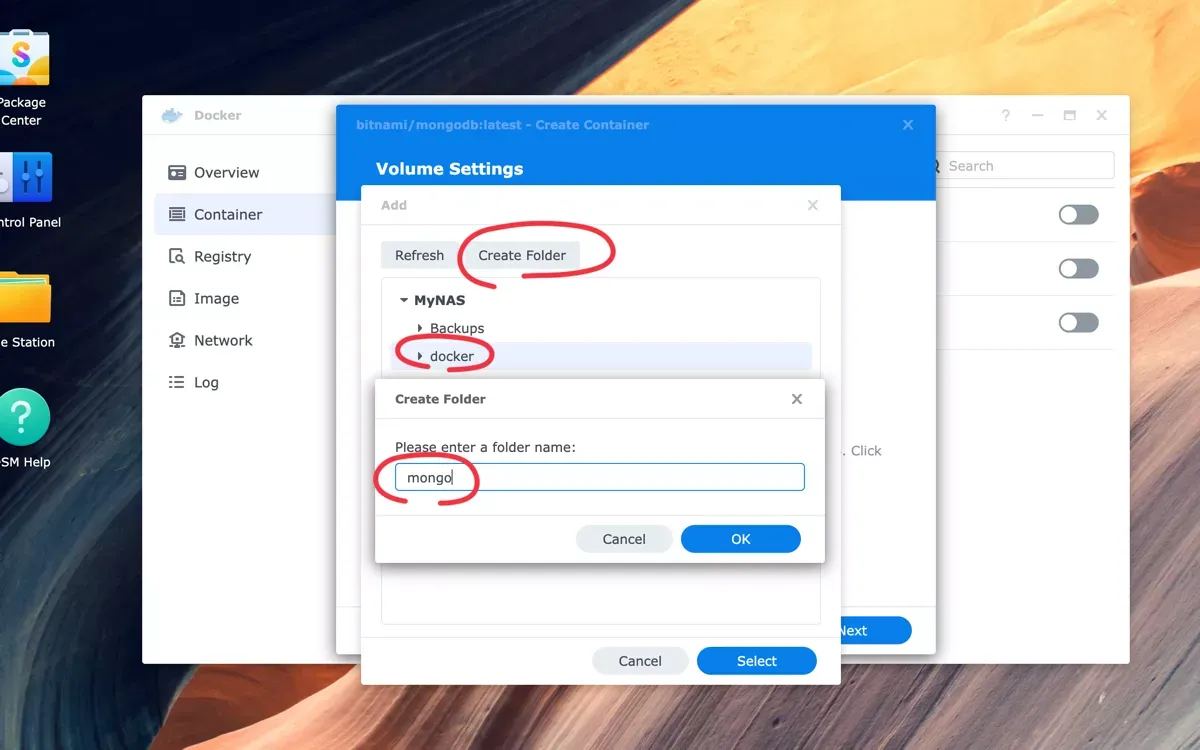
Volume Settings: tell Docker to store MongoDB data in a shared folder
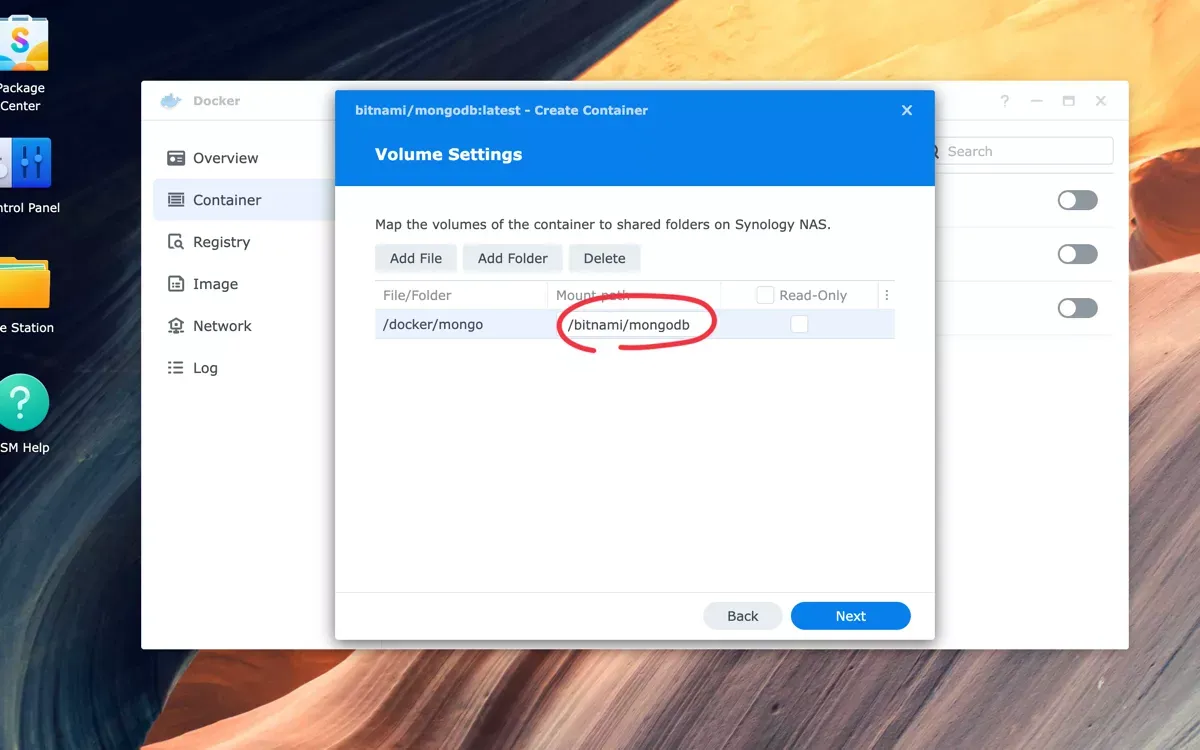
To allow MongoDB to store its data, it is necessary to map the volume to a shared folder that exists on your Synology NAS. To accomplish this, select the "Add Folder" option, then choose to "Create Folder". You will then be prompted to enter a name for the folder; type "mongo" (without quotation marks) and select "OK". Finally, click "Select" to continue with the mapping process.
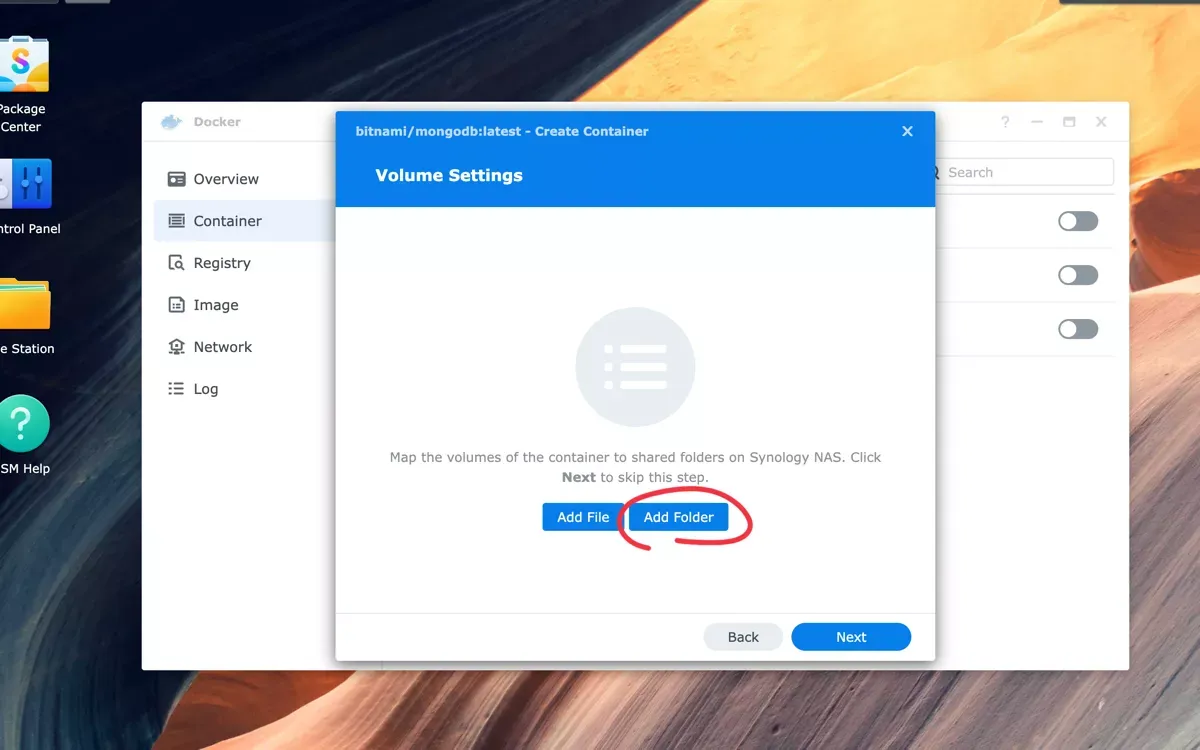
Enter "/bitnami/mongodb" (without quotes) as the mount path and click "Next".
After you have mapped the volume to the shared folder and added all of the necessary environment variables, a summary window will appear. This window will provide you with an opportunity to review all of the settings that you have established. Make sure to uncheck the flag that run MongoDB after the wizard is finished. Once you have verified that everything is correct, you may proceed by selecting the "Done" button.
If you forgot to uncheck the aforementioned flag and you tried to run MongoDB, you will received the following error: "mkdir: cannot create directory '/bitnami/mongodb/data': Permission denied".
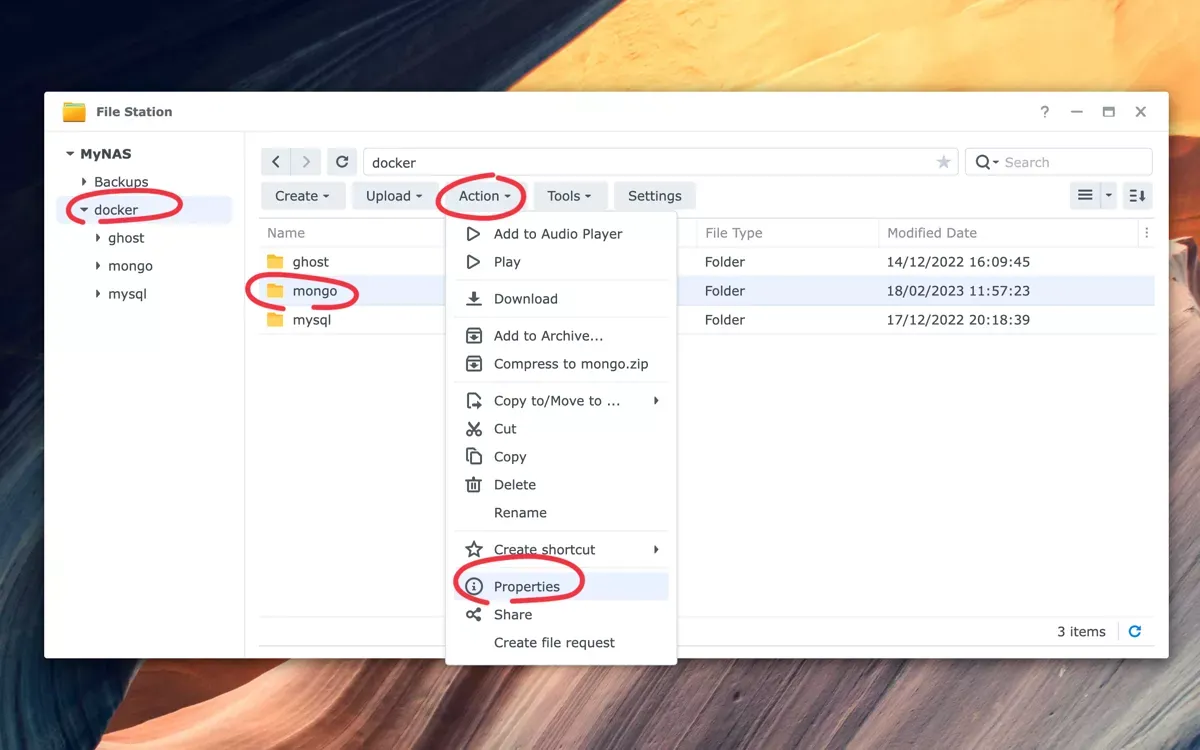
Update Docker folder permission
This error occurs because the Bitnami Docker image necessitates that any mounted files or directories must possess appropriate permissions for UID 1001. Unfortunately, this is difficult to achieve on a Synology NAS. However, a simpler solution is to update the permissions to permit everyone to read and write within the previously created mongo directory.
Open File Station, select the mongo directory, then "Action" and click "Properties".
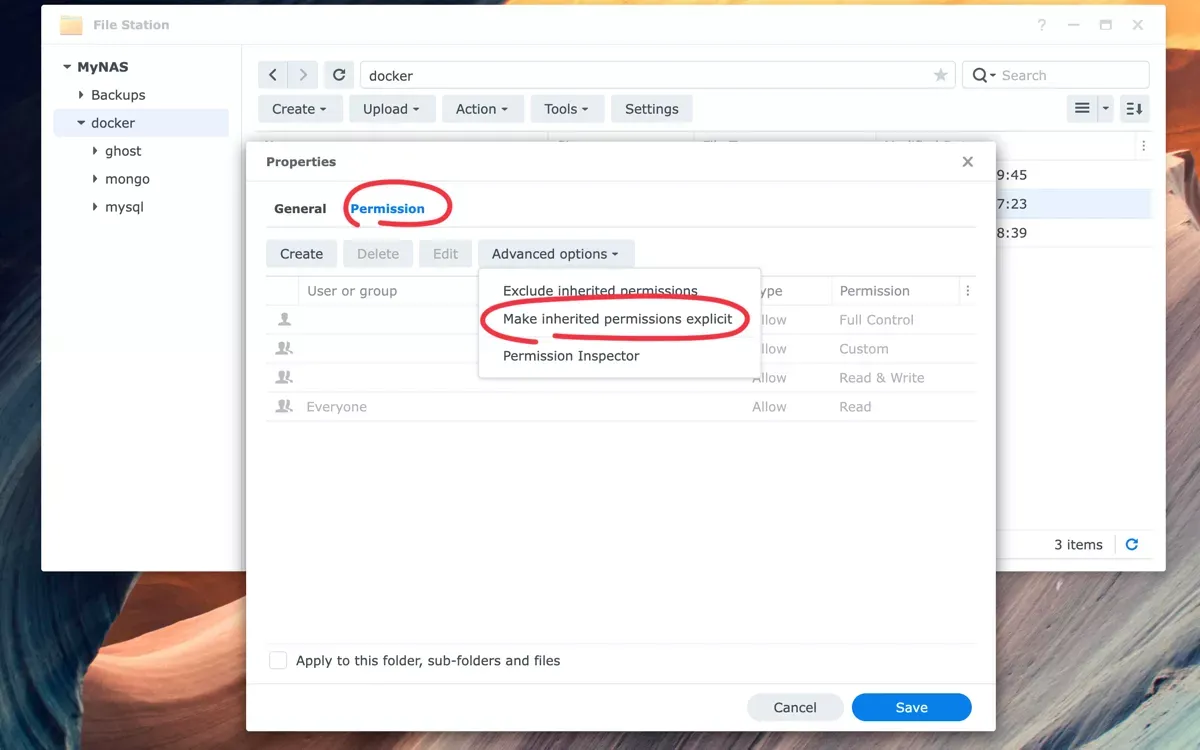
Click the tab "Permission", then "Advanced options" and click "Make inherited permissions explicit".
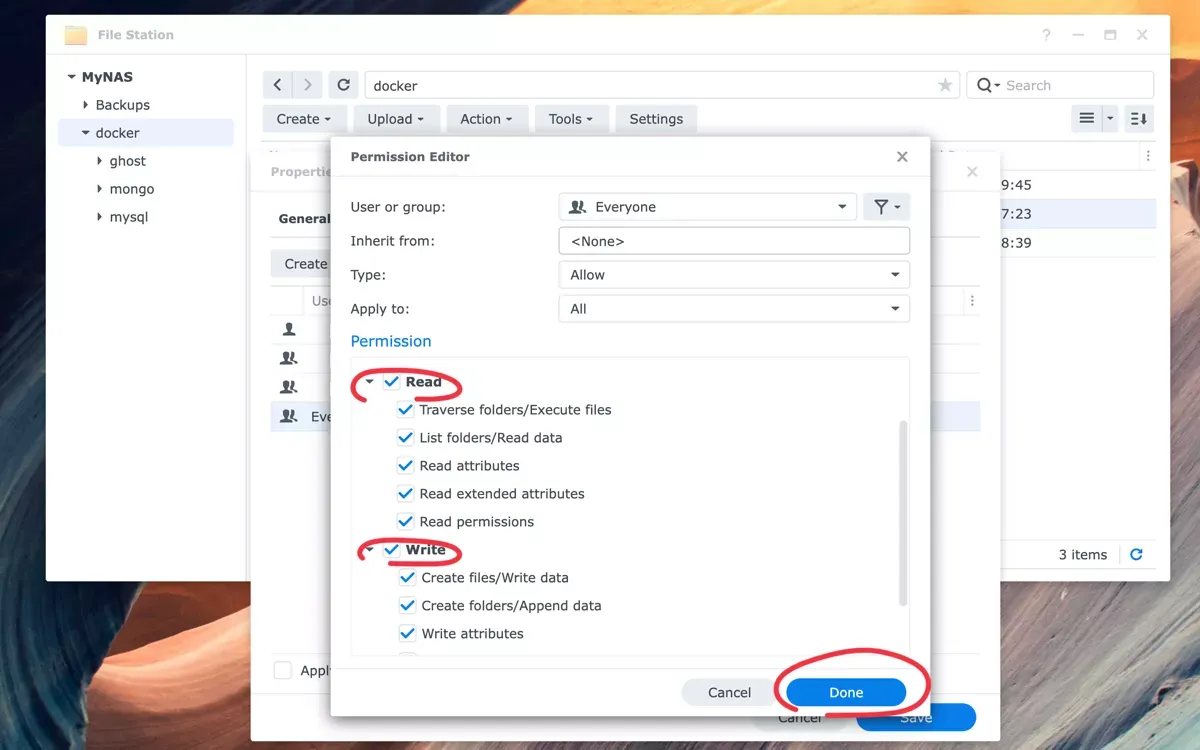
Select the group "Everyone" and click "Edit".
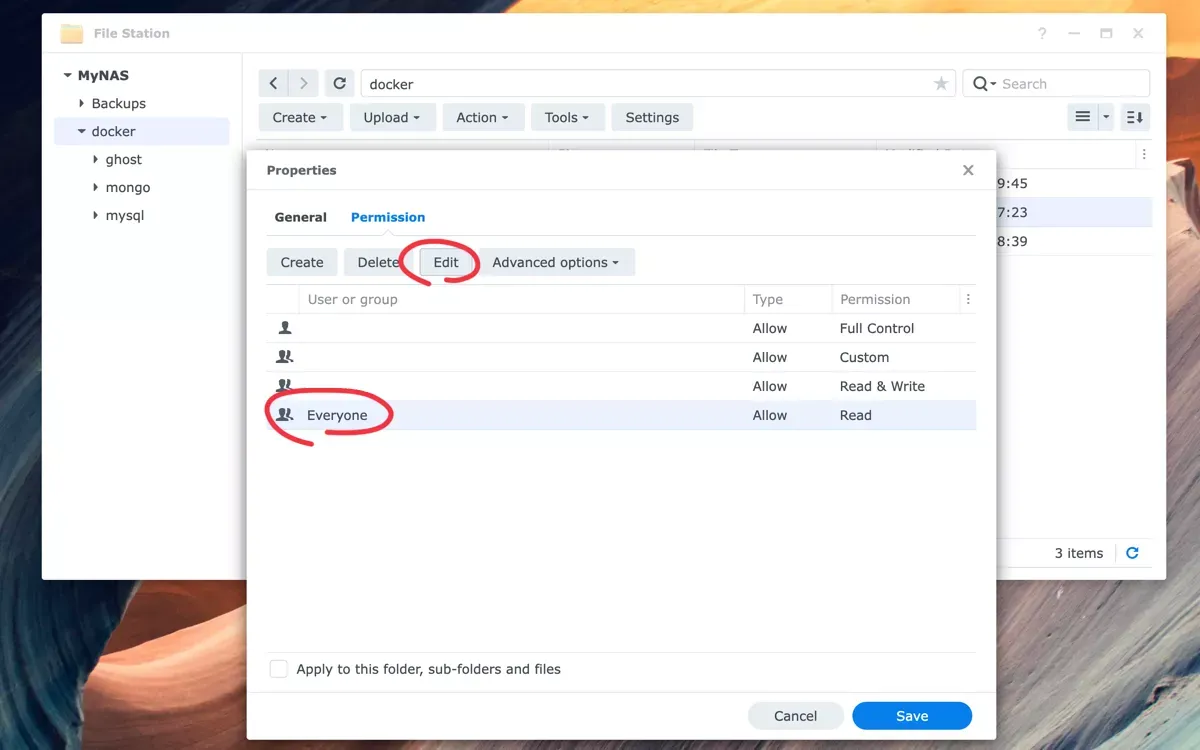
Make sure to check all the "Read" and "Write" flags and then click "Done".
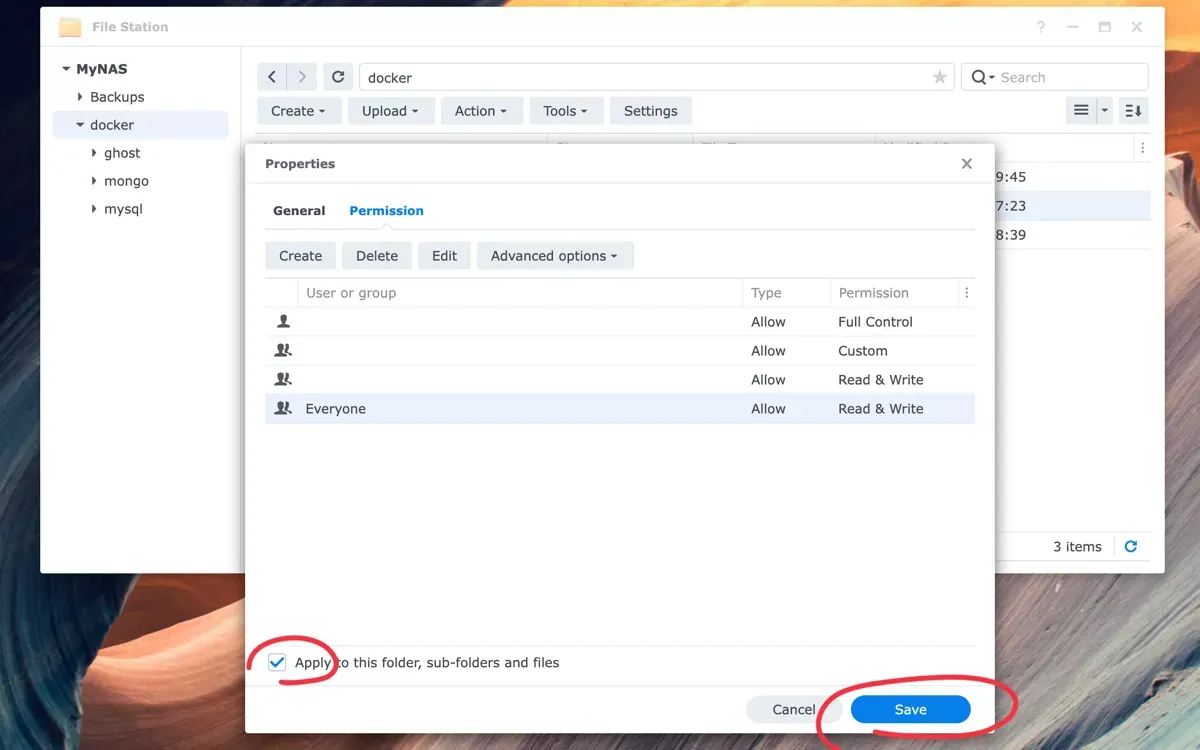
Finally, check "Apply to this folder, sub-folders and files" and click "Save".
Let's run Docker and MongoDB
If you've followed correctly the instructions, you can now run Mongo from Docker.